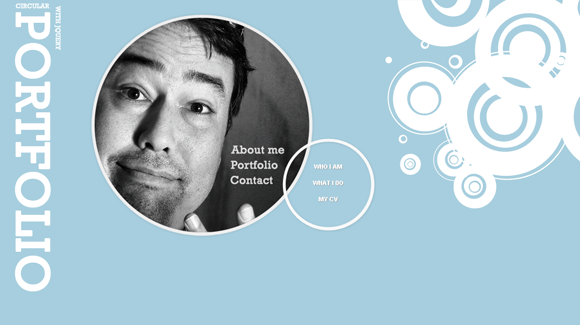
Интересный эффект кругового движения с использованием jQuery
13 июля 2014 | Опубликовано в css | Нет комментариев »
 В этом уроке мы создадим интересный эффект кругового движения с помощью jQuery. Мы воспользуемся модулем jQuery.path, чтобы анимировать меню с круговым движением для примера в подборке работ. Основная задача в том, чтобы создать скругленную область содержимого с основным меню. При наведении указателя мыши на один из элементов меню появится элемент под-меню, двигающийся вокруг области содержимого. Давайте начнем!
Демонстрация работы – Скачать исходный код
Разметка
Код HTML состоит из основного блока, содержащего изображения для области содержимого и элемент для большого круга с содержимым. Основное меню находится внутри большого круга с содержимым. После этого мы определяем структуру для трех маленьких кругов, которые появятся при наведении указателя мыши на элементы меню:
<div>
<div id="images">
<img id="image_about" src="images/1.png" alt="1" style="display:block;"/>
<img id="image_portfolio" src="images/2.png" alt="2"/>
<img id="image_contact" src="images/3.png" alt="3"/>
</div>
<div>
<div id="menu">
 id="about" href="">About me</a>
 id="portfolio" href="">Portfolio</a>
<a id="contact" href="">Contact</a>
</div>
</div>
</div>
<div id="circle_about">
<div>
<ul>
<li><a href="#">Who I am</a></li>
<li><a href="#">What I do</a></li>
<li><a href="#">My CV</a></li>
</ul>
</div>
</div>
<div id="circle_portfolio">
<div>
<div>
<a href="#"><img src="thumbs/1.jpg" alt=""/></a>
<a href="#"><img src="thumbs/2.jpg" alt=""/></a>
...
</div>
</div>
</div>
<div id="circle_contact">
<div>
<ul>
<li><a href="#">Email</a></li>
<li><a href="#">Twitter</a></li>
<li><a href="#">Facebook</a></li>
</ul>
</div>
</div>
В двух из трех маленьких кругов у нас будут списки ссылок. В последнем круге будут изображения.
CSS
Мы абсолютно спозиционируем большую часть элементов, так как так будет намного легче применить модуль jQuery.path. Давайте начнем со стилей первых элементов:
.wrapper{
    font-family: Verdana;
    font-size:11px;
    width:600px;
    height:600px;
    position:relative;
    top:150px;
    left:200px;
}
.images img{
    display:none;
    position:absolute;
    left:6px;
    top:6px;
}
.circleBig{
    position:absolute;
    top:0px;
    left:0px;
    width:418px;
    height:418px;
    background:transparent url(../images/circlebg.png) no-repeat top left;
}
Мы используем все изображения в одном файле для основного меню:
.menu{
    position:absolute;
    width:101px;
    height:74px;
    top:240px;
    left:260px;
    z-index:999;
}
a.about, a.portfolio, a.contact{
    float:left;
    clear:both;
    height:23px;
    margin-bottom:10px;
    width:105px;
    text-indent:-2000000px;
    opacity:0.8;
    background:transparent url(../images/menu.png) no-repeat top left;
}
a.portfolio{
    width:90px;
    background-position:-105px 0px;
}
a.contact{
    width:88px;
    background-position:-199px 0px;
}
a.about:hover, a.portfolio:hover, a.contact:hover{
    opacity:1.0;
}
Круг должен быть расположен правильно, чтобы можно было использовать модуль jQuery.path. Так что нам нужно подтянуть его на нужное место, используя отрицательный внешний отступ? размером в половину ширины или высоты, соответственно.
.circle{
    margin-top:-88px;
    margin-left:-88px;
    width:176px;
    height:176px;
    position:absolute;
    left:0;
    top:0;
    background:transparent url(../images/circle.png) no-repeat top left;
    z-index:10;
    opacity:0;
    filter:progid:DXImageTransform.Microsoft.Alpha(opacity=0);
}
Описания внутри маленьких кругов будут иметь такой стиль:
.description{
    width:120px;
    margin:40px auto;
    text-align:center;
}
.description ul{
    list-style:none;
    text-align:center;
}
.description ul a{
    line-height:30px;
    font-weight:bold;
    color:#fff;
    text-decoration:none;
    text-transform:uppercase;
    font-size:11px;
    text-shadow:1px 1px 1px #aaa;
}
.description ul a:hover{
    color:#f0f0f0;
}
.thumbs a img{
    border:3px solid #f9f9f9;
    -moz-box-shadow:1px 1px 2px #999;
    -webkit-box-shadow:1px 1px 2px #999;
    box-shadow:1px 1px 2px #999;
}
Тень текста и тень блока — свойства CSS3, которые не будут правильно работать в старых версиях браузера Internet Explorer.
Давайте добавим магию.
Javascript
Чтобы использовать модуль jQuery.path, нам нужно определить центр и радиус воображаемого круга, который будет использоваться для поворота маленького круга. В нашем случая воображаемый круг — это большой круг, изображение класса circleBig. Следующая формула даст нам центр координат:
центр x = Положение circleBig по горизонтали + радиус circleBig
центр y = Положение circleBig по вертикали + радиус circleBig
радиус r = Ширина circleBig / 2
$(function() {

    /* when page loads animate the about section by default */
    //move($('#about'),2000,2);

    $('#menu > a').mouseover(
        function(){
            var $this = $(this);
            move($this,800,1);
        }
    );

    /* function to animate / show one circle. speed is the time it takes to show the circle turns is the turns the circle gives around the big circle */
    function move($elem,speed,turns){
        var id = $elem.attr('id');
        var $circle = $('#circle_'+id);

        /* if hover the same one nothing happens */
        if($circle.css('opacity')==1)
            return;

        /* change the image */
        $('#image_'+id).stop(true,true)
                       .fadeIn(650)
                       .siblings()
                       .not(this)
                       .fadeOut(650);

        /* if there's a circle already, then let's remove it: either animate it in a circular movement or just fading out, depending on the current position of it */
        $('#content .circle').each(function(i){
            var $theCircle = $(this);
            if($theCircle.css('opacity')==1)
                $theCircle.stop()
            .animate({
                path : new $.path.arc({
                    center  : [409,359],
                    radius  : 257,
                    start   : 65,
                    end     : -110,
                    dir : -1
                }),
                opacity: '0'
            },1500);
            else
                $theCircle.stop()
            .animate({opacity: '0'},200);
        });
        /* make the circle appear in a circular movement */
        var end = 65 - 360 * (turns-1);
        $circle.stop()
        .animate({
            path : new $.path.arc({
                center  : [409,359],
                radius  : 257,
                start   : 180,
                end     : end,
                dir     : -1
            }),
            opacity: '1'
        },speed);
    }
});
И это все! Наслаждайтесь!
Демонстрация работы – Скачать исходный код
Автор урока Mary Lou
Перевод — Дежурка
Смотрите также:


